字数:7887, 阅读时间:40分钟
从2013年12月8日发布第一个版本至今已,Vue已走过了快八个年头,你了解每个版本名字的意义吗?
| 版本号 | 名字 | 释义 | 时间 |
|---|---|---|---|
| V0.9 | Animatrix | 黑客帝国动画版 | 2014.2.25 |
| V0.10 | Blade Runner | 银翼杀手 | 2014.3.23 |
| V0.11 | Cowboy Bebop | 星际牛仔 | 2014.11.7 |
| V0.12 | Dragon Ball | 龙珠 | 2015.6.12 |
| V1.0 | Evangelion | 新世纪福音战士 | 2015.10.27 |
| V2.0 | Ghost in the Shell | 攻壳机动队 | 2016.9.30 |
| V2.1 | Hunter X Hunter | 全职猎人 | 2016.11.22 |
| V2.2 | Initial D | 头文字D | 2017.2.26 |
| V2.3 | JoJo's Bizarre Adventure | JoJo的奇妙冒险 | 2017.4.2 |
| V2.4 | Kill la Kill | 斩服少女 | 2017.7.13 |
| V2.5 | Level E | 灵异E接触 | 2017.10.13 |
| V2.6 | Macross | 超时空要塞 | 2019.2.4 |
| V3.0 | One Piece | 海贼王 | 2020.9.18 |
| V3.1 | Pluto | 地上最强机器人 | 2021.6.8 |
| V3.2 | Quintessential Quintuplets | 五等分的花嫁 | 2021.8.10 |
原来每个版本的名字都是以漫画命名,那么这些动漫,你看过几部呢?
那么接下来我们就重点聊聊Vue3.0。
缘起
一个新工具的出现,一定是为了解决已有工具存在的问题。我们常常听说Vue不适合开发大型复杂的项目,一个根本原因是 Vue 现有的 API 迫使我们通过选项组织代码,但是有的时候通过逻辑关系组织代码更有意义。另一个原因是目前缺少一种简洁且低成本的机制来提取和重用多个组件之间的逻辑。
那么接下来我们就来看看2.0的问题,以及Vue3是如何来解决的。
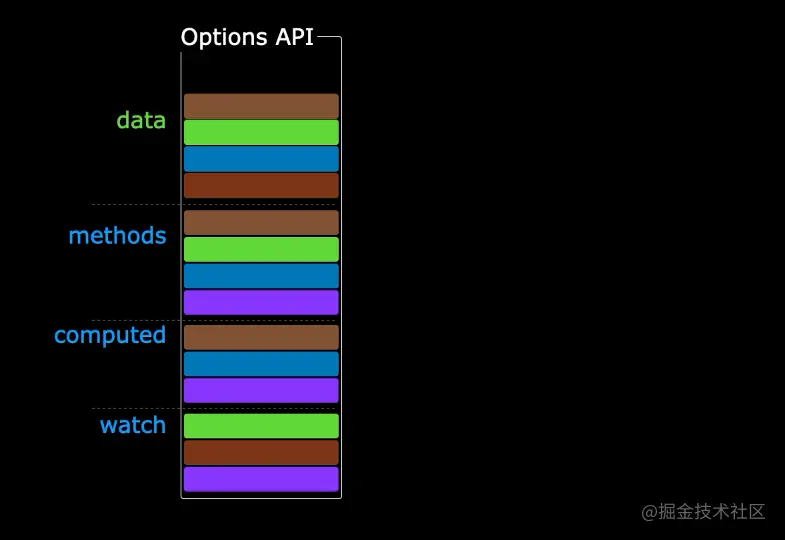
Option式组织代码的缺陷
options式组织代码,同一个功能分散在各个option中,导致在开发时需要在data、methods、computed等option横跳。
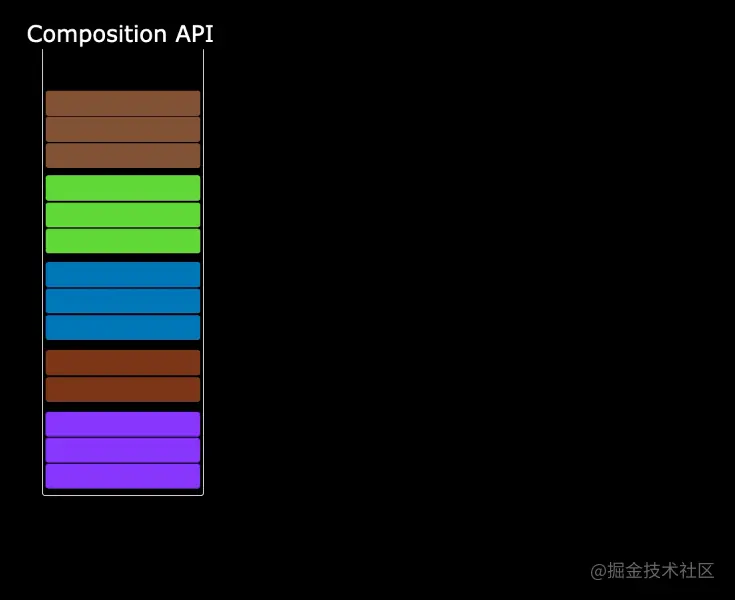
Vue3推出了CompositionApi,目的就是为了解决这个问题,它将分散在各个option中的逻辑组合到一起,下面我们对比看下:
Mixin的问题
对于复杂的功能,我们可能会想到使用Mixin来抽离到单独的文件。但是Mixin会有一些使用上的问题,比如命名冲突、属性来源不明确。
Vue3提出了Hooks的方式,可以将每个功能提取到hooks,一个hooks即是一个独立的函数,所以不会再有上述问题。
TypeScript支持的不健全
现在大型项目都会标配 TypeScript ,Vue 当前的 API 在集成 TypeScript 时遇到了不小的麻烦,其主要原因是 Vue 依靠一个简单的 this 上下文来暴露 property,我们现在使用 this 的方式是比较微妙的。(比如 methods 选项下的函数的 this 是指向组件实例的,而不是这个 methods 对象)。
换句话说,Vue 现有的 API 在设计之初没有照顾到类型推导,这使适配 TypeScript 变得复杂。
当前,大部分使用 TypeScript 的 Vue 开发者都在通过 vue-class-component 这个库将组件撰写为 TypeScript class (借助 decorator)。它必须依赖 decorator——一个在实现细节上存在许多未知数的非常不稳定的 stage 2 提案。基于它是有极大风险的。
Vue3中提出的方案更多地利用了天然对类型友好的普通变量与函数,完美享用类型推导,并且也不用做太多额外的类型标注。
这也同样意味着你写出的 JavaScript 代码几乎就是 TypeScript 的代码。即使是非 TypeScript 开发者也会因此得到更好的 IDE 类型支持而获益。
更好的响应式和性能
众所周知,Vue2的响应式是通过Object.defineProperty 是给对象的某个已存在的属性添加对应的 getter 和 setter,所以它只能监听这个属性值的变化,而不能去监听对象属性的新增和删除。在 Vue 2 的实现中,在组件初始化阶段把数据变成响应式时,遇到子属性仍然是对象的情况,会递归执行 Object.defineProperty 定义子对象的响应式,会有一些性能问题。而且还有一个常见的问题就是通过索引修改数组、为对象直接新增属性,并不会触发响应式更新机制。
而在Vue3中则使用了Proxy来实现响应式,其实并不是Proxy的本身的性能优于Object.defineProperty,其实恰恰相反。那么为什么还要选择Proxy呢?
因为 Proxy 本质上是对某个对象的劫持,这样它不仅仅可以监听对象某个属性值的变化,还可以监听对象属性的新增和删除。而且在实现响应式时,采用了延时处理的方式,当嵌套较深的对象时,只有在其属性被访问的时候才会处理属性的响应式,在性能上会有一定的提升。
支持全局API Treeshaking
Vue3重构了全局和局部的api,均采用ESModule的命名导出访问,支持tree-shaking,只打包使用到的功能,用户只为实际使用的功能买单,同时包体积的减少,也意味着性能的提升。
// vue2
import Vue from 'vue'

Vue.nextTick(() => {
  // 一些和DOM有关的东西
})
// vue3
import { nextTick } from 'vue'

nextTick(() => {
  // 一些和DOM有关的东西
})
以上就是Vue主要的变化,那么接下来我们就来看看有哪些新特性。
新特性与变更
接下来我们主要看一下一些非兼容的重大变更:
全局API
-
支持多个应用根实例,防止全局配置污染
// vue2
// 这会影响两个根实例
Vue.mixin({
  /* ... */
})
const app1 = new Vue({ el: '#app-1' })
const app2 = new Vue({ el: '#app-2' })
// vue3 import { createApp } from 'vue' const app = createApp({}) app.mixin({ /* ... */ })一些其他全局Api的变更详情请查阅全局 API。
-
全局 API重构为可Treeshaking
import { nextTick } from 'vue'

nextTick(() => {
  // 一些和DOM有关的东西
})
// **** 受影响的API
// Vue.nextTick
// Vue.observable (用 Vue.reactive 替换)
// Vue.version
// Vue.compile (仅完整构建版本)
// Vue.set (仅兼容构建版本)
// Vue.delete (仅兼容构建版本)
模板和指令相关
- 更好用的
v-model
替代原有的v-model和v-bind.sync修饰符,通过参数形式,支持使用多个v-model进行双向绑定。
<!-- vue2 -->
<ChildComponent v-model="pageTitle" :title.sync="title"/>
<!-- 完整 -->
<ChildComponent :value="pageTitle" @input="(title)=> (pageTitle=title)" :title="title" @update:title="(title)=> (title=title)"/>
<!-- vue3 -->
<ChildComponent v-model="pageTitle" v-modle:title="title"/>
<!-- 完整 -->
<ChildComponent :model-value="pageTitle" @update:modelValue="(title)=> (pageTitle=title)" :title="title" @update:title="(title)=> (title=title)"/>
<template v-for>的变化
<!-- vue2 -->
<template v-for="item in list">
  <div :key="'heading-' + item.id">...</div>
  <span :key="'content-' + item.id">...</span>
</template>
<!-- vue 3 -->
<template v-for="item in list" :key="item.id">
  <div>...</div>
  <span>...</span>
</template>
v-bind合并顺序变化
<!-- vue2 -->
<div id="red" v-bind="{ id: 'blue' }"></div>
<!-- result -->
<div id="red"></div>
<!-- vue3 -->
<div id="red" v-bind="{ id: 'blue' }"></div>
<!-- result -->
<div id="blue"></div>
-
移除
v-on.native修饰符在以前的版本中,要将原生 DOM 监听器添加到子组件的根元素中,可以使用
.native修饰符。
<!-- vue2 -->
<my-component
  v-on:close="handleComponentEvent"
  v-on:click.native="handleNativeClickEvent"
/>
在vue3中,组件中未被定义为组件触发的所有事件监听器,Vue 现在将把它们作为原生事件监听器添加到子组件的根元素中 (除非在子组件的选项中设置了 inheritAttrs: false)
<!-- vue3 -->
<my-component
  v-on:close="handleComponentEvent"
  v-on:click="handleNativeClickEvent"
/>
<script>
  export default {
    emits: ['close']
  }
</script>
- 支持片段(多根节点)
<!-- vue2 -->
<template>
  <div>
    <header>...</header>
    <main>...</main>
    <footer>...</footer>
  </div>
</template>
在vue2中,组件必须包含在某个元素内部,不支持多个根节点,这有时会给我们写样式带来烦恼,所以vue3中支持了多根节点。
<!-- vue3 -->
<template>
  <header>...</header>
  <main v-bind="$attrs">...</main>
  <footer>...</footer>
</template>
- 新增Teleport传送门
vue应用开发的核心就是组件编写,将 UI 和相关行为封装到组件中来构建 UI。但是有时组件模板的一部分逻辑上属于该组件,而从技术角度来看,最好将模板的这一部分移动到 DOM 中 Vue app 之外的其他位置。
比如最常见的模态窗,我们希望模态窗的逻辑存在于组件中,但在UI上,元素最好又挂载到DOM根节点(如body)上,方便我们进行css来定位。
<body>
  <div style="position: relative;">
    <h3>Tooltips with Vue 3 Teleport</h3>
    <div>
      <modal-button></modal-button>
    </div>
  </div>
</body>
const app = Vue.createApp({});

app.component('modal-button', {
  template: `
    <button @click="modalOpen = true">
        Open full screen modal!
    </button>

    <div v-if="modalOpen" class="modal">
      <div>
        I'm a modal!
        <button @click="modalOpen = false">
          Close
        </button>
      </div>
    </div>
  `,
  data() {
    return {
      modalOpen: false
    }
  }
})
在上面的例子中,我们可以看到一个问题——模态框是在深度嵌套的 div 中渲染的,而模态框的 position:absolute 以父级相对定位的 div 作为引用,最终的效果会受父级定位的影响,这可能并不是我们期望的结果。
Teleport 提供了一种干净的方法,允许我们控制在 DOM 中哪个父节点下渲染了 HTML,而不必求助于全局状态或将其拆分为两个组件。
app.component('modal-button', {
  template: `
    <button @click="modalOpen = true">
        Open full screen modal! (With teleport!)
    </button>

    <teleport to="body">
      <div v-if="modalOpen" class="modal">
        <div>
          I'm a teleported modal!
          (My parent is "body")
          <button @click="modalOpen = false">
            Close
          </button>
        </div>
      </div>
    </teleport>
  `,
  data() {
    return {
      modalOpen: false
    }
  }
})
组件
- 函数式组件
在vue2中我们可能因为性能和多根节点的需求而使用函数式组件,当在vue3中,针对普通组件性能做了优化,已经和函数组件性能相差无几,而且也支持多根节点,因此函数式组件的使用场景不是很有必要了,所以针对函数式组件进行了一些调整:
<!-- Vue 2 函数式组件示例 -->
<script>
export default {
  functional: true,
  props: ['level'],
  render(h, { props, data, children }) {
    return h(`h${props.level}`, data, children)
  }
}
</script>

<!-- Vue 2 函数式组件示例使用 <template> -->
<template functional>
  <component
    :is="`h${props.level}`"
    v-bind="attrs"
    v-on="listeners"
  />
</template>
<script>
export default {
  props: ['level']
}
</script>
在vue3中删除了functional option和functional attribute,上面两种方式不能在vue3中使用了。
在vue3中函数式组件即是一个普通函数,接收两个参数:props 和 context。
// vue3
import { h } from 'vue'

const DynamicHeading = (props, context) => {
  return h(`h${props.level}`, context.attrs, context.slots)
}

DynamicHeading.props = ['level']

export default DynamicHeading
- 创建异步组件
以前可以通过返回一个Promise的函数来定义异步组件:
// vue2
const asyncModal = () => import('./Modal.vue');
// 或者带上配置
const asyncModal = {
  component: () => import('./Modal.vue'),
  delay: 200,
  timeout: 3000,
  error: ErrorComponent,
  loading: LoadingComponent
}
在vue3中,新增呢一个api(defineAsyncComponent)来显示定义异步组件。
// vue3
import { defineAsyncComponent } from 'vue'
import ErrorComponent from './components/ErrorComponent.vue'
import LoadingComponent from './components/LoadingComponent.vue'

// 不带选项的异步组件
const asyncModal = defineAsyncComponent(() => import('./Modal.vue'))

// 带选项的异步组件
const asyncModalWithOptions = defineAsyncComponent({
  loader: () => import('./Modal.vue'),
  delay: 200,
  timeout: 3000,
  errorComponent: ErrorComponent,
  loadingComponent: LoadingComponent
})
- 新增
emits选项,定义和验证发出的自定义事件
<!-- vue2 -->
<template>
  <div>
    <p>{{ text }}</p>
    <button v-on:click="$emit('accepted')">OK</button>
  </div>
</template>
<script>
  export default {
    props: ['text']
  }
</script>
vue3中增加了emits选项来显示定义组件的自定义事件,未声明 emits 的事件监听器都会被算入组件的 $attrs 并绑定在组件的根节点上。
<!-- vue3 -->
<template>
  <div>
    <p>{{ text }}</p>
    <button v-on:click="$emit('accepted')">OK</button>
  </div>
</template>
<script>
  export default {
    props: ['text'],
    emits: ['accepted']
  }
</script>
emits还可以支持对自定义事件进行验证,只需要改为对象形式即可。
emits: {
    // 没有验证函数
    click: null,

    // 带有验证函数
    submit: payload => {
      if (payload.email && payload.password) {
        return true
      } else {
        console.warn(`Invalid submit event payload!`)
        return false
      }
    }
  }
强烈建议使用 emits 记录每个组件所触发的所有事件,而且记录的事件会有代码提示。
渲染函数
-
统一插槽API
以前,在组件中获取插槽是两个不同的api(
this.$scopedSlots和this.$slots),现在统一使用this.$slots。 -
整合
$listeners、class、style到$attrs
在vue2时,我们可以通过如下方式访问attribute 和事件监听器:
<!-- vue3 -->
<template>
  <label>
    <input type="text" v-bind="$attrs" v-on="$listeners" />
  </label>
</template>
<script>
  export default {
    inheritAttrs: false
  }
</script>
在 Vue 3 的虚拟 DOM 中,事件监听器现在只是以 on 为前缀的 attribute,这样就成了 $attrs 对象的一部分,因此 $listeners 被移除了。
<!-- vue3 -->
<template>
  <label>
    <input type="text" v-bind="$attrs" />
  </label>
</template>
<script>
export default {
  inheritAttrs: false
}
</script>
在 Vue 2 的虚拟 DOM 实现中对 class 和 style attribute 有一些特殊处理。因此,它们不包含在 $attrs 中,Vue3中简化了这部分的处理,用$attrs 包含所有的 attribute,包括class和style。
自定义元素
- 只能在
<component>元素中使用isprop
在vue3中不能在普通组件和元素使用is属性,仅能在component内置组件中使用。
其他
-
生命周期变更
destroyed生命周期选项被重命名为unmountedbeforeDestroy生命周期选项被重命名为beforeUnmount
-
自定义指令生命周期调整,和组件生命周期统一
- created - 新的!在元素的 attribute 或事件侦听器应用之前调用。
- bind → beforeMount
- inserted → mounted
- beforeUpdate:新的!这是在元素本身更新之前调用的,很像组件生命周期钩子。
- update → 移除!有太多的相似之处要更新,所以这是多余的,请改用
updated。 - componentUpdated → updated
- beforeUnmount:新的!与组件生命周期钩子类似,它将在卸载元素之前调用。
- unbind -> unmounted
-
Mixin 合并行为变更
当来自组件的 data() 及其 mixin 或 extends 基类被合并时,现在将浅层次执行合并。
- 过渡的class名更改
过渡类名 v-enter 修改为 v-enter-from、过渡类名 v-leave 修改为 v-leave-from。
-
VNode 生命周期事件变更
<!-- vue2 -->
<template>
  <child-component @hook:updated="onUpdated">
</template>
<!-- vue3 --> <template> <child-component @vnode-updated="onUpdated"> </template>
废弃的API
keyCode作为v-on的修饰符及config.keyCodes配置。
<!-- 键码版本(废弃) -->
<input v-on:keyup.13="submit" />

<!-- 别名版本 -->
<input v-on:keyup.enter="submit" />

<script>
Vue.config.keyCodes = { // 废弃
  f1: 112
}
</script>
$on,$off和$once实例方法已被移除,组件实例不再实现事件触发接口
在vue2中我们可以通过EventBus实现组件通信:
// eventBus.js
const eventBus = new Vue()
export default eventBus
// ChildComponent.vue
import eventBus from './eventBus'
export default {
  mounted() {
    // 添加 eventBus 监听器
    eventBus.$on('custom-event', () => {
      console.log('Custom event triggered!')
    })
  },
  beforeDestroy() {
    // 移除 eventBus 监听器
    eventBus.$off('custom-event')
  }
}
// ParentComponent.vue
import eventBus from './eventBus'
export default {
  methods: {
    callGlobalCustomEvent() {
      eventBus.$emit('custom-event') // 当 ChildComponent 被挂载,控制台中将显示一条消息
    }
  }
}
在vue3中,此方式不再有效,因为完全移除了 $on、$off 和 $once 方法。如果需要,可以使用一些实现了事件触发器接口的外部库,或者使用Provide,复杂的直接上Vuex就对了。
- 不再支持过滤器
<!-- vue2 -->
<template>
  <h1>Bank Account Balance</h1>
  <p>{{ accountBalance | currencyUSD }}</p>
</template>

<script>
  export default {
    props: {
      accountBalance: {
        type: Number,
        required: true
      }
    },
    filters: {
      currencyUSD(value) {
        return '$' + value
      }
    }
  }
</script>
在vue3中可以使用方法或者计算属性替代:
<!-- vue3 -->
<template>
  <h1>Bank Account Balance</h1>
  <p>{{ accountInUSD }}</p>
</template>

<script>
  export default {
    props: {
      accountBalance: {
        type: Number,
        required: true
      }
    },
    computed: {
      accountInUSD() {
        return '$' + this.accountBalance
      }
    }
  }
</script>
-
删除
$childrenproperty$childrenproperty 已移除,不再支持。如果你需要访问子组件实例,我们建议使用 $refs。 -
全局函数
set和delete以及实例方法$set和$delete。基于代理的变化检测不再需要它们了。
当然,上面的只是开胃菜,接下来的才是我们最值得关注的新特性。

组合式Api
为了解决我们前面说的逻辑复用和代码组织的问题,vue3推出了新的代码编写方式,这个vue3最重要的特性,也是未来编写vue的主要趋势。
下面是一个显示某个用户的仓库列表的视图,同时带有搜索和筛选功能,伪代码如下:
// src/components/UserRepositories.vue

export default {
  components: { RepositoriesFilters, RepositoriesSortBy, RepositoriesList },
  props: {
    user: {
      type: String,
      required: true
    }
  },
  data () {
    return {
      repositories: [], // 1
      filters: { ... }, // 3
      searchQuery: '' // 2
    }
  },
  computed: {
    filteredRepositories () { ... }, // 3
    repositoriesMatchingSearchQuery () { ... }, // 2
  },
  watch: {
    user: 'getUserRepositories' // 1
  },
  methods: {
    getUserRepositories () {
      // 使用 `this.user` 获取用户仓库
    }, // 1
    updateFilters () { ... }, // 3
  },
  mounted () {
    this.getUserRepositories() // 1
  }
}
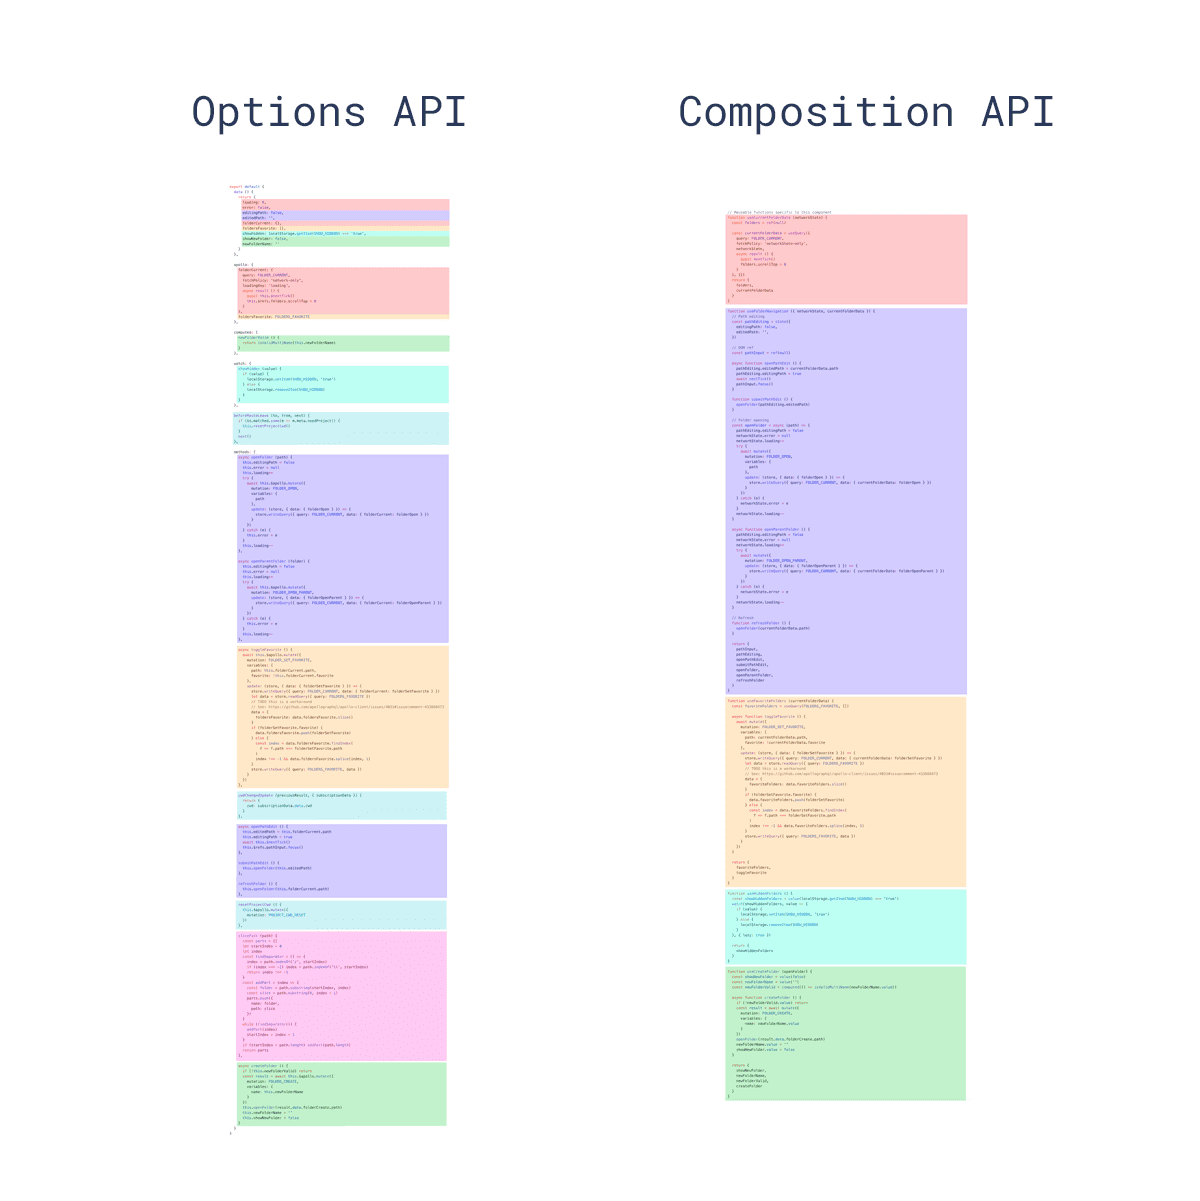
可以看到,按option组织代码,功能逻辑点是碎片化的分散在各个组件选项中,特别是遇到一些内容较多的组件,需要在各个选项中反复跳转,阅读和书写代码将是一件非常痛苦的事情,大大降低了组件的可维护性。
其实,在开发和阅读组件代码的时候,我们更多是关注的功能点,而不是去关注用了那些options,这正是组合式api解决的问题。
// src/composables/useUserRepositories.js

import { fetchUserRepositories } from '@/api/repositories'
import { ref, onMounted, watch } from 'vue'

export default function useUserRepositories(user) {
  const repositories = ref([])
  const getUserRepositories = async () => {
    repositories.value = await fetchUserRepositories(user.value)
  }

  onMounted(getUserRepositories)
  watch(user, getUserRepositories)

  return {
    repositories,
    getUserRepositories
  }
}
// src/composables/useRepositoryNameSearch.js

import { ref, computed } from 'vue'

export default function useRepositoryNameSearch(repositories) {
  const searchQuery = ref('')
  const repositoriesMatchingSearchQuery = computed(() => {
    return repositories.value.filter(repository => {
      return repository.name.includes(searchQuery.value)
    })
  })

  return {
    searchQuery,
    repositoriesMatchingSearchQuery
  }
}
// src/components/UserRepositories.vue
import { toRefs } from 'vue'
import useUserRepositories from '@/composables/useUserRepositories'
import useRepositoryNameSearch from '@/composables/useRepositoryNameSearch'
import useRepositoryFilters from '@/composables/useRepositoryFilters'

export default {
  components: { RepositoriesFilters, RepositoriesSortBy, RepositoriesList },
  props: {
    user: {
      type: String,
      required: true
    }
  },
  setup(props) {
    const { user } = toRefs(props)

    const { repositories, getUserRepositories } = useUserRepositories(user)

    const {
      searchQuery,
      repositoriesMatchingSearchQuery
    } = useRepositoryNameSearch(repositories)

    const {
      filters,
      updateFilters,
      filteredRepositories
    } = useRepositoryFilters(repositoriesMatchingSearchQuery)

    return {
      // 因为我们并不关心未经过滤的仓库
      // 我们可以在 `repositories` 名称下暴露过滤后的结果
      repositories: filteredRepositories,
      getUserRepositories,
      searchQuery,
      filters,
      updateFilters
    }
  }
}
组合式API分离了组件的逻辑关注点,更具组织性,代码的可读性和可维护性也更好。而且可以将可复用的逻辑抽离成Hooks,具有更好的可复用性。
由于组合式API的特殊性,需要使用新的API,接下来我们就来看看这些API。
setup
setup是组合式API的入口,所有的内容都需要包含在其中,它仅在组件创建之前执行一次,所以此时this并不是指向当前组件实例。
setup(props,context){
  const { attrs, slots, emit } = context;
	// ...
}
参数
{Data} props:接收到的props数据,是响应式的。{SetupContext} context:一个对象,包含组件需要的上下文信息,包含attrs、slots、emit。
返回值
- 如果返回一个对象,那么该对象的 property 以及传递给
setup的props参数中的 property 就都可以在模板中访问到。
<!-- MyBook.vue -->
<template>
  <div>{{ collectionName }}: {{ readersNumber }} {{ book.title }}</div>
</template>

<script>
  import { ref, reactive } from 'vue'

  export default {
    props: {
      collectionName: String
    },
    setup(props) {
      const readersNumber = ref(0)
      const book = reactive({ title: 'Vue 3 Guide' })

      // 暴露给 template
      return {
        readersNumber,
        book
      }
    }
  }
</script>
- 如果返回一个渲染函数,该函数可以直接使用在同一作用域中声明的响应式状态。
// MyBook.vue

import { h, ref, reactive } from 'vue'

export default {
  setup() {
    const readersNumber = ref(0)
    const book = reactive({ title: 'Vue 3 Guide' })
    // 请注意这里我们需要显式调用 ref 的 value
    return () => h('div', [readersNumber.value, book.title])
  }
}
生命周期钩子
为了使组合式 API 的功能和选项式 API 一样完整,我们还需要一种在 setup 中注册生命周期钩子的方法。组合式 API 上的生命周期钩子与选项式 API 的名称相同,但前缀为 on:即 mounted 看起来会像 onMounted。
import { onMounted, onUpdated, onUnmounted } from 'vue'

const MyComponent = {
  setup() {
    onMounted(() => {
      console.log('mounted!')
    })
    onUpdated(() => {
      console.log('updated!')
    })
    onUnmounted(() => {
      console.log('unmounted!')
    })
  }
}
setup代替了beforeCreate和created,对比如下:
| 选项式 API | Hook inside setup |
|---|---|
beforeCreate |
Not needed* |
created |
Not needed* |
beforeMount |
onBeforeMount |
mounted |
onMounted |
beforeUpdate |
onBeforeUpdate |
updated |
onUpdated |
beforeUnmount |
onBeforeUnmount |
unmounted |
onUnmounted |
errorCaptured |
onErrorCaptured |
renderTracked |
onRenderTracked |
renderTriggered |
onRenderTriggered |
activated |
onActivated |
deactivated |
onDeactivated |
响应式
在vue3中,使用了Proxy代替了Object.defineProperty,使 Vue 3 避免了 Vue 早期版本中存在的一些响应性问题。
当我们从一个组件的 data 函数中返回一个普通的 JavaScript 对象时,Vue 会将该对象包裹在一个带有 get 和 set 处理程序的 Proxy 中。
举个🌰:
const dinner = {
  meal: 'tacos'
}

const handler = {
  get(target, property, receiver) { // 捕捉器
    track(target, property)  // 跟踪property读取,收集依赖
    return Reflect.get(...arguments) // Reflect将this绑定到Proxy
  },
  set(target, property, value, receiver) {
    trigger(target, property) // 执行副作用依赖项
    return Reflect.set(...arguments)
  }
}

const proxy = new Proxy(dinner, handler)
console.log(proxy.meal)

// tacos
- 当一个值被读取时进行追踪:proxy 的
get处理函数中track函数记录了该 property 和当前副作用。 - 当某个值改变时进行检测:在 proxy 上调用
set处理函数。 - 重新运行代码来读取原始值:
trigger函数查找哪些副作用依赖于该 property 并执行它们。
该被代理的对象对于用户来说是不可见的,但是在内部,它们使 Vue 能够在 property 的值被访问或修改的情况下进行依赖跟踪和变更通知。
那么组件是如何让渲染响应数据变化的呢?
组件的模板会被编译成一个 render 函数,它用来创建 VNodes,描述该组件应该如何被渲染。这个render函数被包裹在一个副作用中,允许 Vue 在运行时跟踪被“触达”的 property,当property变化的时候,就会执行对应的副作用,从而执行render重新渲染。当然在渲染并不会整个重新渲染,这里有一些优化手段,网上资料很多,这里不展开讲。
接下来我们看看几个常用的响应式API。
ref
interface Ref<T> {
  value: T
}
function ref<T>(value: T): Ref<T>
接受一个内部值并返回一个响应式且可变的 ref 对象。ref 对象具有指向内部值的单个 property .value。
import { ref } from 'vue'

const counter = ref<number>(0)

console.log(counter) // { value: 0 }
console.log(counter.value) // 0

counter.value++
console.log(counter.value) // 1
因为在 JavaScript 中,Number 或 String 等基本类型是通过值而非引用传递的,在任何值周围都有一个封装对象,这样我们就可以在整个应用中安全地传递它,而不必担心在某个地方失去它的响应性。
注意:ref嵌套在响应式对象(如reactive、readonly)或者用在模板中,将自动解包。
reactive
function reactive<T extends object>(target: T): UnwrapNestedRefs<T>
返回对象的响应式副本,即一个深层递归转换的proxy对象。
import { reactive } from 'vue'
interface IState{
  count:number
}
// state 现在是一个响应式的状态
const state = reactive<IState>({
  count: 0,
})
ref和reactive:
- 一般基础数据类型使用ref,对象使用reactive
- 如果将对象分配为 ref 值,则通过 reactive 方法使该对象具有高度的响应式。
readonly
接受一个对象 (响应式或纯对象) 或 ref 并返回原始对象的只读代理。只读代理是深层的:任何被访问的嵌套 property 也是只读的。
const original = reactive({ count: 0 })

const copy = readonly(original)

watchEffect(() => {
  // 用于响应性追踪
  console.log(copy.count)
})

// 变更 original 会触发依赖于副本的侦听器
original.count++

// 变更副本将失败并导致警告
copy.count++ // 警告!
unref
如果参数是一个 ref,则返回内部值,否则返回参数本身。这是 val = isRef(val) ? val.value : val 的语法糖函数。
function useFoo(x: number | Ref<number>) {
  const unwrapped = unref(x) // unwrapped 现在一定是数字类型
}
toRef
可以用来为源响应式对象上的某个 property 新创建一个 ref,它会保持对其源 property 的响应式连接。
const state = reactive({
  foo: 1,
  bar: 2
})

const fooRef = toRef(state, 'foo')

fooRef.value++
console.log(state.foo) // 2

state.foo++
console.log(fooRef.value) // 3
toRefs
将响应式对象转换为普通对象,其中结果对象的每个 property 都是指向原始对象相应 property 的 ref。
function useFeatureX() {
  const state = reactive({
    foo: 1,
    bar: 2
  })

  // 操作 state 的逻辑

  // 返回时转换为ref
  return toRefs(state)
}

export default {
  setup() {
    // 可以在不失去响应性的情况下解构
    const { foo, bar } = useFeatureX()

    return {
      foo,
      bar
    }
  }
}
要识别数据是否使用上述api处理过,可以使用这些api:isRef、isProxy、isReactive、isReadonly`。
computed
// 只读的
function computed<T>(
  getter: () => T,
  debuggerOptions?: DebuggerOptions
): Readonly<Ref<Readonly<T>>>

// 可写的
function computed<T>(
  options: {
    get: () => T
    set: (value: T) => void
  },
  debuggerOptions?: DebuggerOptions
): Ref<T>
interface DebuggerOptions {
  onTrack?: (event: DebuggerEvent) => void
  onTrigger?: (event: DebuggerEvent) => void
}
interface DebuggerEvent {
  effect: ReactiveEffect
  target: any
  type: OperationTypes
  key: string | symbol | undefined
}
- 接受一个 getter 函数,并根据 getter 的返回值返回一个不可变的响应式 ref 对象。
const count = ref(1)
const plusOne = computed(() => count.value + 1)

console.log(plusOne.value) // 2

plusOne.value++ // 错误
- 接受一个具有
get和set函数的对象,用来创建可写的 ref 对象。
const count = ref(1)
const plusOne = computed({
  get: () => count.value + 1,
  set: val => {
    count.value = val - 1
  }
})

plusOne.value = 1
console.log(count.value) // 0
watchEffect
function watchEffect(
  effect: (onInvalidate: InvalidateCbRegistrator) => void,
  options?: WatchEffectOptions
): StopHandle

interface WatchEffectOptions {
  flush?: 'pre' | 'post' | 'sync' // 默认:'pre'
  onTrack?: (event: DebuggerEvent) => void
  onTrigger?: (event: DebuggerEvent) => void
}

interface DebuggerEvent {
  effect: ReactiveEffect
  target: any
  type: OperationTypes
  key: string | symbol | undefined
}

type InvalidateCbRegistrator = (invalidate: () => void) => void

type StopHandle = () => void
立即执行传入的一个函数,同时响应式追踪其依赖,并在其依赖变更时重新运行该函数。
const count = ref(0)

watchEffect(() => console.log(count.value))
// -> logs 0

setTimeout(() => {
  count.value++
  // -> logs 1
}, 100)
- 停止侦听
当 watchEffect 在组件的 setup() 函数或生命周期钩子被调用时,侦听器会被链接到该组件的生命周期,并在组件卸载时自动停止。当然也可以显式调用返回值以停止侦听:
const stop = watchEffect(() => {
  /* ... */
})
// later
stop()
- 清除副作用
有时副作用函数会执行一些异步的副作用,这些响应需要在其失效时清除。所以侦听副作用传入的函数可以接收一个 onInvalidate 函数作入参,用来注册清理失效时的回调。当以下情况发生时,这个失效回调会被触发:
-
副作用即将重新执行时
-
侦听器被停止 (如果在
setup()或生命周期钩子函数中使用了watchEffect,则在组件卸载时)
watchEffect(onInvalidate => {
  const token = performAsyncOperation(id.value)
  onInvalidate(() => {
    // id has changed or watcher is stopped.
    // invalidate previously pending async operation
    token.cancel()
  })
})
另外可以使用flush option或者watchPostEffect和watchSyncEffect来调整其刷新时机。
watch
// 侦听单一源
function watch<T>(
  source: WatcherSource<T>,
  callback: (
    value: T,
    oldValue: T,
    onInvalidate: InvalidateCbRegistrator
  ) => void,
  options?: WatchOptions
): StopHandle

// 侦听多个源
function watch<T extends WatcherSource<unknown>[]>(
  sources: T
  callback: (
    values: MapSources<T>,
    oldValues: MapSources<T>,
    onInvalidate: InvalidateCbRegistrator
  ) => void,
  options? : WatchOptions
): StopHandle

type WatcherSource<T> = Ref<T> | (() => T)

type MapSources<T> = {
  [K in keyof T]: T[K] extends WatcherSource<infer V> ? V : never
}

// 参见 `watchEffect` 共享选项的类型声明
interface WatchOptions extends WatchEffectOptions {
  immediate?: boolean // 默认:false
  deep?: boolean
}
watch 需要侦听特定的数据源,并在单独的回调函数中执行副作用。默认情况下,它也是惰性的——即回调仅在侦听源发生变化时被调用。
- 与 watchEffect 相比,
watch允许我们:- 惰性地执行副作用;
- 更具体地说明应触发侦听器重新运行的状态;
- 访问被侦听状态的先前值和当前值。
// 侦听一个 getter
const state = reactive({ count: 0 })
watch(
  () => state.count,
  (count, prevCount) => {
    /* ... */
  }
)

// 直接侦听一个 ref
const count = ref(0)
watch(count, (count, prevCount) => {
  /* ... */
})
watch([fooRef, barRef], ([foo, bar], [prevFoo, prevBar]) => {
  /* ... */
})
当然,前面只是介绍了常用的API,更多的请查看响应式API。
弊端
当然组合式API也并不是银弹,至少目前来说不是,还是存在一些问题。
- Ref 的心智负担
读写ref必须带上.value,语法冗余,目前还没有确定的方案来解决此问题。不过尤大给出了refSuger2提案,就看后续社区认可度怎么样了。
<script setup>
  // declaring a variable that compiles to a ref
  let count = $ref(1)

  console.log(count) // 1

  function inc() {
    // the variable can be used like a plain value
    count++
  }
</script>

<template>
  <button @click="inc">{{ count }}</button>
</template>
难看冗长的返回语句
setup() 的返回语句变得冗长,像是重复劳动,而且还是存在代码上下横跳问。
在vue3.2提供了SetupScript语法糖,就没有这个问题了。
- 需要更多的自我克制
虽然组合式 API 在代码组织方面提供了更多的灵活性,但它也需要开发人员更多地自我克制来 “正确地完成它”。也有些人担心 API 会让没有经验的人编写出面条代码。换句话说,虽然组合式 API 提高了代码质量的上限,但它也降低了下限。
我们需要更多的考虑如何合理的组织代码,推荐根据逻辑关注点将程序分解成函数和模块来组织它。
SetupScript
<script setup> 是在单文件组件 (SFC) 中使用组合式 API 的编译时语法糖。相比于普通的 <script> 语法,它具有更多优势:
- 更少的样板内容,更简洁的代码。
- 能够使用纯 Typescript 声明 props 和发出事件。
- 更好的运行时性能 (其模板会被编译成与其同一作用域的渲染函数,没有任何的中间代理)。
- 更好的 IDE 类型推断性能 (减少语言服务器从代码中抽离类型的工作)。
<script setup>
// 导入
import { capitalize } from './helpers'
// 组件
import MyComponent from './MyComponent.vue'
// 变量
const msg = 'Hello!'

// 函数
function log() {
  console.log(msg)
}

</script>

<template>
  <div @click="log">{{ msg }}</div>
  <div>{{ capitalize('hello') }}</div>
  <MyComponent />
</template>
上面<script setup>中的代码会被编译成组件setup()函数的内容,不同的是<script setup> 中的代码会在每次组件实例被创建的时候执行。而且所有顶层的绑定 (包括变量,函数声明,以及 import 引入的内容) 都会暴露给模板,可以直接使用,甚至连组件都无需手动注册。
在继续下面的内容前,我们来看一个词编译器宏,他们不需要导入,且会在处理 <script setup> 的时候被编译处理掉。<script setup>提供了如下几个编译器宏:
- defineProps
- defineEmits
- defineExpose
- withDefaults
接下来看一下<script setup>独有的API:
defineProps声明Props,接收props选项相同的值
const props = defineProps({
  foo: {
    type:String,
    default:''
  }
})
如果使用了TypeScript,也可以使用纯类型声明来声明Props。
// 普通
const props = defineProps<{
  foo: string
  bar?: number
}>()


// 默认值
interface Props {
  msg?: string
  labels?: string[]
}

const props = withDefaults(defineProps<Props>(), {
  msg: 'hello',
  labels: () => ['one', 'two']
})
defineEmits声明emits,接收emits选项相同的值
// 普通
const emit = defineEmits(['change', 'delete'])
// TS类型声明
const emit = defineEmits<{
  (e: 'change', id: number): void
  (e: 'update', value: string): void
}>()
defineExpose声明暴露的绑定
使用 <script setup> 的组件是默认关闭的,也即通过模板 ref 或者 $parent 链获取到的组件的公开实例,不会暴露任何在 <script setup> 中声明的绑定。需要开发者明确声明暴露的属性。
<script setup>
import { ref } from 'vue'

const a = 1
const b = ref(2)

defineExpose({
  a,
  b
})
</script>
useSlots和useAttrs分别对应setupContext.slots和setupContext.attrs,也可以在普通的组合式 API 中使用。
<script setup>
import { useSlots, useAttrs } from 'vue'

const slots = useSlots()
const attrs = useAttrs()
</script>
目前还有一些事情是 <script setup>不能做到的,就需要和普通的<script>一起使用:
<script>
// 普通 <script>, 在模块范围下执行(只执行一次)
runSideEffectOnce()

// 声明额外的选项
export default {
  inheritAttrs: false,
  customOptions: {}
}
</script>

<script setup>
// 在 setup() 作用域中执行 (对每个实例皆如此)
</script>
更多内容请查看SetupScript。
其他
-
- 选择器
/* 深度选择器 */
.a :deep(.b) {
  /* ... */
}

/* 插槽选择器 */
:slotted(div) {
  color: red;
}

/* 全局选择器 */
:global(.red) {
  color: red;
}
<style module>
<template>
  <p :class="$style.red">
    This should be red
  </p>
</template>

<style module>
.red {
  color: red;
}
</style>
也可以自定义注入的名称:
<template>
  <p :class="classes.red">red</p>
</template>

<style module="classes">
.red {
  color: red;
}
</style>
我们可以在组合API中通过useCssModule来使用:
// 默认, 返回 <style module> 中的类
useCssModule()

// 命名, 返回 <style module="classes"> 中的类
useCssModule('classes')
使用状态驱动的动态 CSS:
<script setup>
const theme = {
  color: 'red'
}
</script>

<template>
  <p>hello</p>
</template>

<style scoped>
p {
  color: v-bind('theme.color');
}
</style>
- 关注RFCS,回溯历史,洞悉未来